Thursday, April 11, 2013

Cranberry Orange Scones

This recipe was inspired by a bag of California oranges we bought from a roadside pick-up truck.  It is popular in these parts for people in the Latino community to come from California and bring truck loads of produce to sell out of the backs of their trucks to Oregon patrons.  The oranges are some of the best and are much fresher than what we can buy in the store.

About a week ago we were in Salem doing some shopping and purchased an 8 lb bag of navel oranges for $5.  Looking at the bowl on the table made me crave some cranberry orange scones.

Instead of looking up a recipe on the internet I opted to modify one of my existing scone recipes since I'd never made cranberry orange scones before.  What follows is the result.  I was quite pleased.


CRANBERRY ORANGE SCONES

INGREDIENTS:

2 cups Flour (I used all purpose)
3 tsp Baking Powder
1/4 tsp Salt
2 Tbsp Turbinado or Raw Sugar
1/2 cup Dried Cranberries
1/4 cup Earth Balance Vegan Margarine
3/4 cup Unsweetened Soy Milk
1/4 cup Orange Juice
1 Tbsp Orange Zest

DIRECTIONS:

1.  Preheat oven to 450˚F (232˚C).  Spray a cookie sheet with non stick cooking spray.

2.  In large mixing bowl combine flour, baking powder, salt, and raw sugar.  

3.  Cut in margarine with a pastry blender until in resembles fine crumbs.

4.  Stir in cranberries and orange zest.  Make a well in the center of the flour mixture by pushing the mixture towards the sides of the bowl.

5.  Add the soy milk and orange juice and stir to combine.  Turn out onto floured surface and knead a few times to combine if necessary.

6.  Pat and shape into a flat round approximately 3/4 to 1 inch thick.

7.  Cut into 6-8 wedges depending on desired size.  Place on cookie sheet.


8.  Bake at 450˚F for 10-12 minutes until golden brown on top.  Remove from oven and cool on a wire rack.


9.  If you would like to drizzle a glaze on them.  Combine powdered sugar with just enough orange juice to make desired consistency.

**  If you cover these overnight, the moisture from the glaze will make the tops of the scones a little sticky (or tacky) to the touch.  They are best served the same day but taste fine leftover the next day as well.

- Bon Appetit

" Joy and Temperance and Repose, slam the door on the doctor's nose." - Henry Wadsworth Longfellow
.

Monday, April 1, 2013

Texas Rice Salad - Vegan & Gluten Free

I found this recipe about 6 or more years ago.  I can't remember where I found it, as it has been handwritten on a recipe card for years. A Google search reveals many variations, some vegetarian some not so much.

I forget about the recipe and then when I make it I wonder why I've waited so long to make it.  It is great scooped with tortilla chips or served over a bed of greens.  I've even made this to take camping and it packs well in the cooler.  Just add the avocado fresh when ready to serve. 


TEXAS RICE SALAD

INGREDIENTS:

3 cups cooked Brown Rice
1 Can Black Beans, drained and rinsed
1 cup whole kernel Corn, thawed  (or 1 can drained)
1 Avocado, peeled and diced
1 cup Salsa of your choosing
1/2 cup Cilantro, chopped  (optional)
1/4 cup sliced Green Onions or Red Onion
2 Tbsp Lemon Juice
Salt and Pepper to taste
    *  Tortilla chips or mixed greens for serving

DIRECTIONS:

1.  Mix all ingredients in a medium bowl.

2.  Serve immediately or refrigerate up to 3 days.


*  This recipe is so easy you can understand why I didn't take any pictures of the mixing process.  

*  When choosing your ingredients keep in mind green onions will give a milder flavor than red onion. Also, the salad is best when using fresh salsa from the refrigerated section of the store as opposed to jarred salsa that gets cooked in the canning process.

TIP - If you have brown rice already cooked in goes together in minutes.  I knew I didn't have a lot of time when I wanted to make this so I used pre-cooked frozen organic brown rice form Trader Joe's.  I thawed it in the microwave for a few minutes and let it cool while getting the other ingredients together.  If you need to cook the rice just cool it in the freezer for a few minutes.  The salad is good slightly warm too.  

* The tortilla chips in the pictures are Black Bean & Quinoa chips from Trader Joe's.

- Bon Appetit

"  Life is an onion and one cries while peeling it." - French Proverb
.

Wednesday, March 27, 2013

Peanut Butter & Maple Cookies

This is one of those recipes I've had for over 20 years.  Found in a small cookbook like you'd see by the check-out counter in the grocery store - I believe it was a Pillsbury Bake-Off cookbook.  When I was downsizing it was long ago re-typed from the original book and is hiding away in a protector sleeve in a binder.

I was never really a fan of peanut butter cookies until I found this recipe.  This one is so light and chewy, to this day, it is the only one I'll make.  And now I have made it vegan.  


PEANUT BUTTER & MAPLE COOKIES

INGREDIENTS:

1/2 cup Brown Sugar, firmly packed
1/2 cup Vegan Margarine such as Earth Balance
1/2 cup natural unsalted smooth Peanut Butter
1/2 cup real Maple Syrup
1-1/2 tsps Ener-G Egg Replacer + 1 Tbsp warm water
1-1/2 cups all purpose Flour
1/2 tsp Baking Soda
1/4 tsp Salt
1/4 tsp Baking Powder
    White sugar for criss-crossing tops of cookies

DIRECTIONS:

1.  Preheat oven to 350˚F (176˚C).

2.  In a large electric mixing bowl beat brown sugar, margarine and peanut butter until light and fluffy.

3.  While this is mixing combine the Ener-G egg replacer and warm water.  Set aside.

4.  Add the maple syrup and egg replacer to mixer and beat well.

5.  In separate bowl combine dry ingredients.

6.  Mix dry ingredients into wet and mix well.  Cover and refrigerate 30 minutes to make handling easier.

(Mixed up dough ready for the refrigerator)
7.  Shape dough into 1 inch balls and place at least 2 inches apart on a greased cookie sheet.

8.  With fork dipped in the granulated white sugar press a criss cross pattern into the tops of the dough.

9.  Bake at 350˚F for 10-12 minutes or until golden brown.

10.  Let rest on cookie sheet for a few minutes before removing and cooling on a wire rack.

*  Makes approximately 3 dozen


- Bon Appetit

" No man in the world has more courage than the man who can stop eating after one peanut." - Channing Pollock
.

Tuesday, March 19, 2013

Vegan "Cheesy" Potato Casserole


Since Winter hasn't released it's chilly grip on the weather I've turned to comforting casseroles for dinner some nights.

I believe I originally found this recipe on vegweb.com approximately six years ago. I've gone back to see if I can find it to link it here and it isn't there anymore.  A Google search just reveals the typical hash brown and cream of mushroom soup variety of potato casserole.  I prefer this one.

I modified the original recipe by adding this and that and omitting other things.  What follows is my modified recipe that is a favorite of ours and I make it once every few weeks during cooler weather.  

I prefer to make the recipe using Gimme Lean Italian Sausage but have also used a soy chorizo when wanting a Mexicana or nacho flair.  It is good plain, but the version with the Gimme Lean is my favorite and that is what I'll post today.


CHEESY POTATO CASSEROLE

INGREDIENTS:

4-5 large red or white Potatoes thinly sliced
1 medium Onion, thinly sliced or shredded
1/2 Cup (1 stick) Vegan Margarine
1/2 Cup Flour ( I use a slightly heaping cup)
3 - 1/2 Cups boiling Water
2 Tbsp Soy Sauce
1 - 1/2 Tsp granulated Garlic
1/2 tsp Turmeric
1 Cup Nutritional Yeast Flakes
1 - 14 oz can diced Green chilies
1/2 Cup more or less Panko Bread Crumbs
** Optional - 1 pkg Gimme Lean Italian Sausage flavor

DIRECTIONS:

1.  Preheat oven to 450˚F (232˚C).  Oil a large casserole dish with nonstick cooking spray.

2.  If using the Gimme Lean, cube in small pieces and cook in a frying pan until brown.  Set aside.

(Gimme Lean browning in the pan)
3.  Place shredded potatoes and onions in the casserole dish, mix together then set aside. The easiest way to slice the potatoes and onions is to use a mandolin or a food processor.  I use a mandolin.

(Potatoes and onions mixed together)
4.  In a medium pan bring 3.5 cups of water to a boil.  In a separate large saucepan melt the margarine over medium low heat and then add flour and whisk together.  Slowly add the boiling water while whisking together.  Then add soy sauce, granulated garlic, and turmeric and keep whisking until sauce is thick and bubbling.  About 2-3 minutes depending on your stove.  

5.  Add nutritional yeast and green chillies and mix thoroughly. If using Gimme Lean add it to the sauce now. 

(Sauce prior to adding Gimme Lean)
6.  Pour the sauce over the potatoes and stir. I prefer to pour half the sauce, stir, then pour the remaining sauce and stir once again.  Your mixture should look like the following picture.

(Ready for the Panko)
7.  Top with Panko crumbs and cover with aluminum foil.

(Topped with Panko and ready for the oven)
8.  Place in 450˚F oven for 30 minutes covered.  Uncover and bake for an additional 30 minutes for a total of 60 minutes baking time.

(Fresh from the oven - steam obscured a sharp focus)
9.  Remove from oven and let rest 5-8 minutes until the sauce stops bubbling.

Serve and enjoy.  You can serve this with crusty bread if carbs are not an issue.  It is also good with a side of steamed broccoli or a side salad.  We usually just have it on its own topped with a little jalapeno hot sauce for a kick.

("Cheesy" goodness - definitely not a health food)
- Bon Appetit

"  Most of the food allergies die under garlic and onion." - Martin H. Fischer
.

Thursday, March 14, 2013

Simple Sticky Buns

This recipe is one given to Troubadour approximately six years ago by a former co worker.  I have modified it slightly in that I've cut the amount of margarine in half and upped the cinnamon content.

It is a great recipe for cold winter mornings or when you are having overnight company and don't want to spend a lot of time cooking in the morning.

I only make this recipe about once a year since it isn't healthy, but it sure is good.

**This recipe is prepared the night before, so please plan ahead**


SIMPLE STICKY BUNS


INGREDIENTS:

1 Pkg Cook Butterscotch Pudding (Not instant)
1/4 Cup Vegan Margarine (I used Earth Balance)
1/2 Cup packed Brown Sugar
1 Tbsp Cinnamon
12-15 Rhodes frozen White Dinner Rolls
1/2 Cup chopped Pecans or Walnuts


DIRECTIONS:

1.  Grease a bundt pan and set aside.

2.  In a small bowl mix margarine, brown sugar, and cinnamon until well combined and set aside. If you need to soften the margarine in the microwave for a few seconds it still works fine.

3.  Evenly distribute the frozen rolls in the bottom of the bundt pan in one layer.

(One layer of frozen rolls)
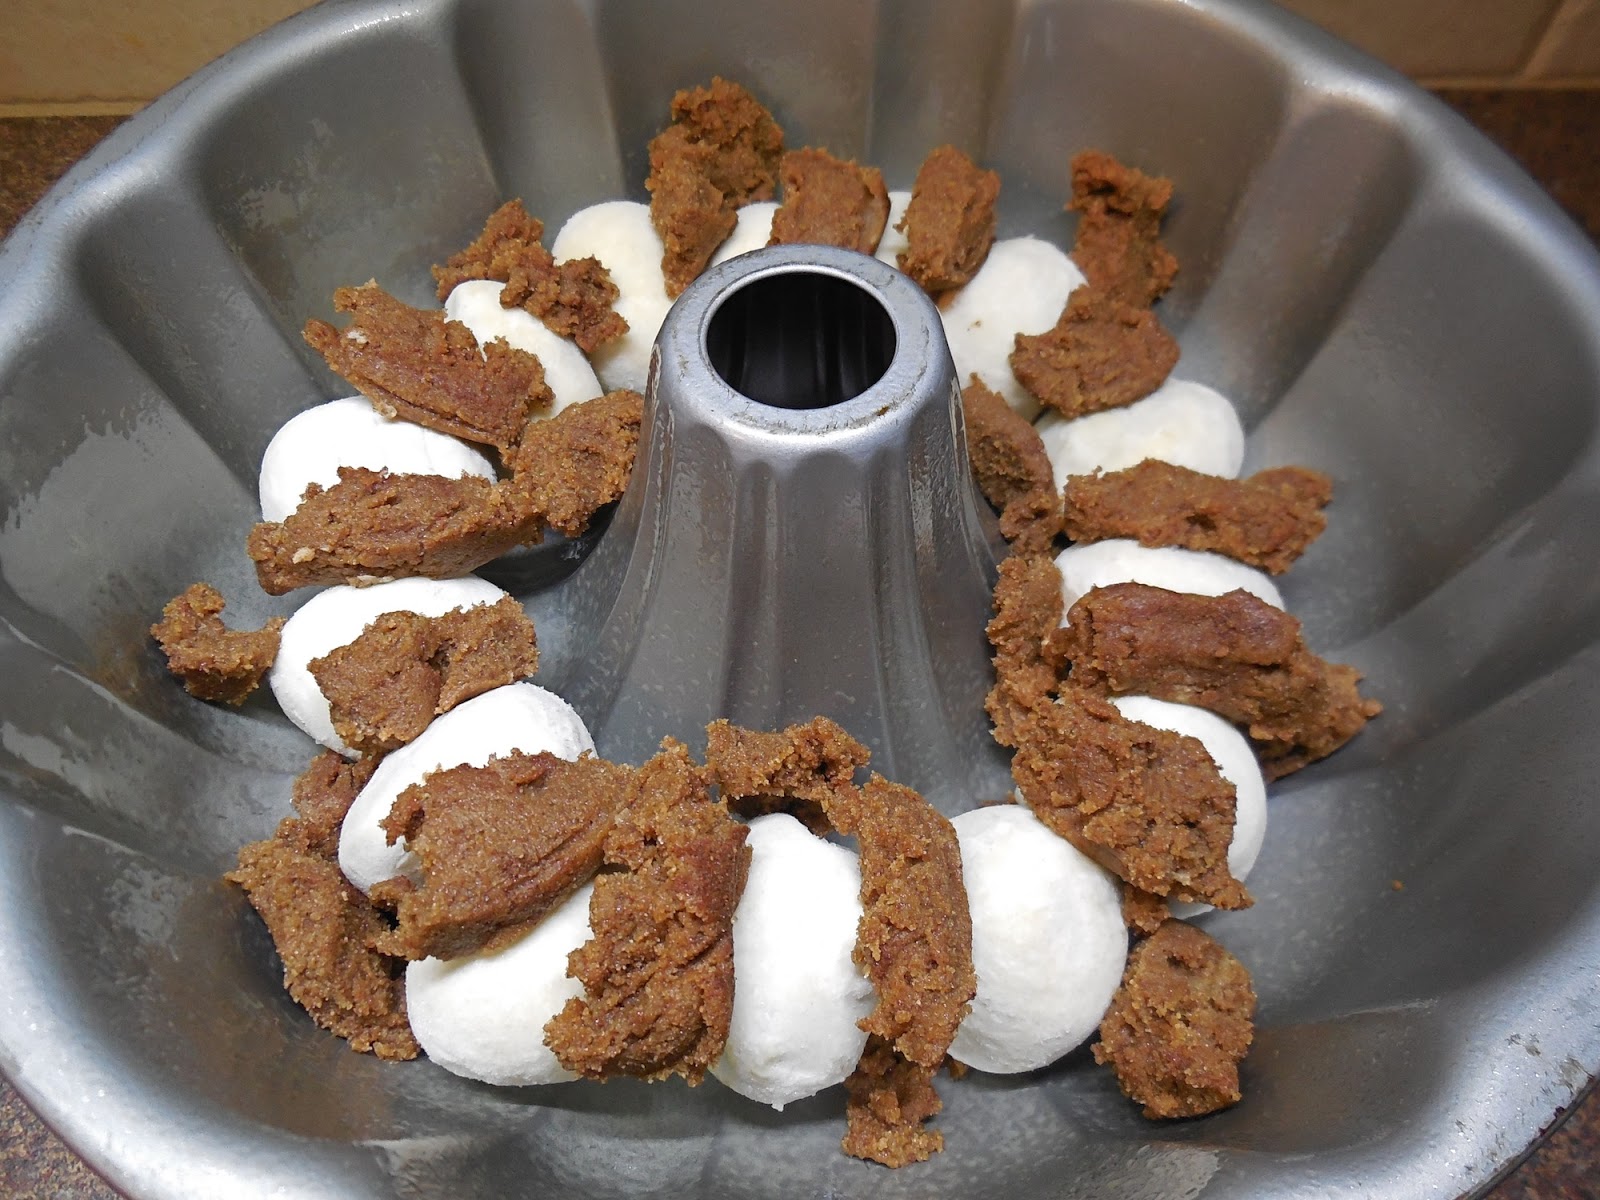
4.  Drop teaspoons of the brown sugar mixture on top of rolls.

(Brown sugar mixture on top of rolls)
5.  Sprinkle with dry Butterscotch pudding.

(Dry pudding sprinkled on top)
6.  Sprinkle pecans or walnuts on top if using.

(Walnuts sprinkled on top)
7.  Place in cold oven overnight without turning it on.  Do not turn oven light on as this will cause the buns to raise too much.

(All set for the night)
8.  When you wake up in the morning the buns will have risen overnight.  Note - prepare these right before bed so they don't rise too much. 


(Ready to bake)
9.  Without taking pan out of oven.  Turn the oven on to 350˚F (176˚C) and set your timer for 25-30 minutes.  Mine were done to a golden brown in only 25 minutes.  It just depends on your oven.

10.  Take pan out of oven and let rest a few minutes.

(Fresh from the oven)
11.  Turn over onto platter and serve warm.

(Sticky cinnamony goodness)
These are delicious warmed in the microwave the next morning too.

** Note - most Jello cook puddings use cornstarch and not gelatin - they are 'accidentally vegan'.  Be sure to check the label of your pudding to make sure it is vegan.

- Au Revoir

" I like cinnamon rolls, but I don't always have time to make a pan.  That is why I wish they'd sell cinnamon roll incense.  After all, I'd rather light a stick and have my roommate wake up with false hopes." - Mitch Hedberg
.

Saturday, March 9, 2013

Tasty Tempeh Meatloaf

When I hear the word meatloaf, it always brings thoughts of my Grandpa to the forefront.  Whenever we'd visit as kids he'd be busy in the kitchen making a meatloaf.  It was never the same twice.  He had a habit of throwing any leftovers from the fridge into it.  Once there were even green beans in the meatloaf.  We came to call it "mixed loaf" as he just mixed up whatever he could find to add to the ground beef.

I've read that a good way to make vegan meatloaf is to use grated tempeh.  If you search the internet there are a lot of different recipes, some making large batches and some small.  Some use spicy sriracha sauce and others a lot of ketchup.

I decided to try and make my own hybrid variety loosely based on some of the others.  I wanted a small batch since it is just the two of us.  It turned out pretty darn good for a first attempt. SpartanBabe, I think this would be good using the sausage seasoning mix you were going to buy.

My husband enjoyed the meal as well, and said it was a 'do over'.  In man-speak this means 'please make it again'.  The next time I make it I am going to press it into my Texas size muffin pan so that we have individual portions rather than trying to slice it.  I used to do that with traditional meatloaf and it works quite well.  This batch made 2 good sized dinner portions with a small portion for lunch leftover.


TASTY TEMPEH MEATLOAF


INGREDIENTS:

1 - 8oz pkg of Tempeh (I used soy tempeh)
1 cup Quick Oats
1 small Onion, minced
2 Tbsp Nutritional Yeast
1 Tbsp Herbs de Provence
1 Tsp Fennel Seeds
1 Tsp Granulated Garlic
2 Tbsp Low Sodium Soy Sauce or Tamari
2 Tbsp Spicy Dijon Mustard
4 Tbsp spicy BBQ Sauce


DIRECTIONS:

1.  Heat over to 350˚F (177˚C) and spray a loaf pan or large muffin pan with non-stick cooking spray. I like to use the Trader Joe's Olive Oil Spray.

2.  In medium size mixing bowl add the oats and grate the tempeh using a cheese grater.  Mix those two together, then add onion, nutritional yeast, Herbs de Provence, fennel seeds and granulated garlic.  Mix again.

(Oats, grated tempeh, onion and dry spices)
3.  Add soy sauce, dijon mustard and BBQ sauce.  Stir together then let rest at least 5 minutes to let flavors incorporate and tempeh soften.

(All ingredients mixed together)
4.  Spoon into loaf or muffin pan and press very hard packing into the corners.

(Ready for the oven)
5.  Bake 30 minutes until golden brown on top.  Remove from oven and let cool for 10 minutes to firm up.

(Fresh from the oven)
6.  Run a knife around the edge and turn over onto a serving plate.

(Ready for serving)
7.  Slice and serve with mashed potatoes and gravy.

(Get in my belly)

** After eating dinner I was thinking of the leftovers for lunch the next day and maybe putting triple ginger sauce on it since there wasn't any leftover gravy.  This really got me thinking that I could do several versions of this recipe.  One with grated ginger and sesame seeds and maybe water chestnuts served with steamed whole edamame pods on the side as an Asian version.  Or one with curry powder and turmeric served with dal on the side for a taste of India.  Just a few thoughts going through my mind at how versatile this recipe could potentially be.

- Au Revoir

"If we aren't willing to settle for junk living, we certainly shouldn't settle for junk food." - Sally Edwards
.